My Documents
A new ‘My Documents’ tab is available on your portal. For each of your clients, you will be able to upload and access documents and files. This enables quick access to documents as well as the ability for us to securely transfer documents and data with you.
You will be reminded on the portal home screen if there are any unread documents, and an email notification will be sent to you if we have uploaded a document.
Here are step by step instructions on adding, accessing and deleting a document:
1) Access the documents tab
To access the Documents tab for a client, from the portal home screen locate the client and then select Client Details where you will be directed to the Employer Details screen.
2) Select “employer documents”
Scroll to the bottom of the Employer Details screen and select Employer Documents.
3) Employer correspondence screen
The Employer Correspondence screen is displayed where you can view all portal documents held against the client.
4) Add a new document
To add a new document click on the Add Document link.
5) Enter document title
Enter a title of document and select the file to upload by selecting the Choose File option.
6) Save your document
Upon clicking Save, you will be directed back to the My Documents screen where you will see the new document has been added.
7) Access a document
To access a document, select the document title link under the View Document column.
8) Mark a document as read
To mark a document as ‘read’, select the checkbox on the Mark as Read column and click save.
9) Delete a document
To delete a document, select Delete against the relevant record and then OK to confirm.
Additional users
Your portal can now have multiple users, each with their own personal login and unique user ID. You can control the level of access to full administration including file uploads, or just grant read only access.
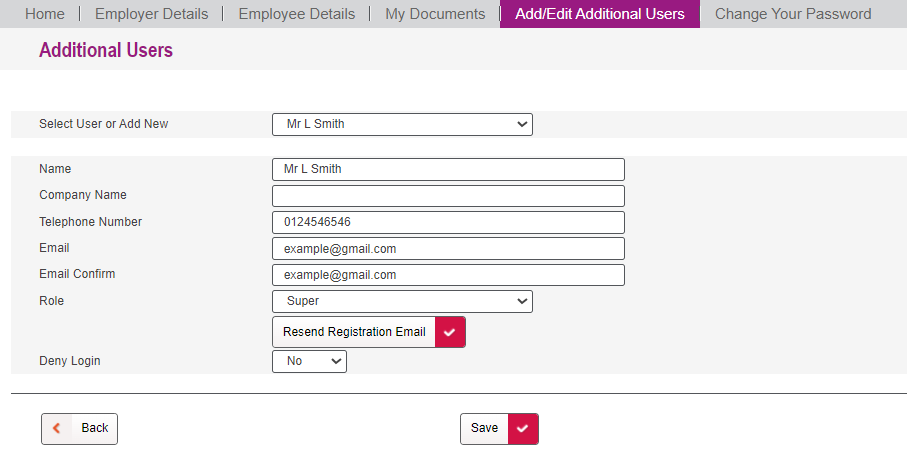
To add users, select the Add/Edit Additional User tab from the home screen of the portal.
Adding a new user
To add a new user, click on the Select User or Add New field and select Add New.
Complete their personal details and the level of access:
- Super: Full Access to all functions including the ability to add further users.
- Admin: Full access to all portal screens and functions including payroll upload. Admin Users will not have access to add or amend other users.
- View Only: Access to all screens including My Documents but without ability to amend or upload new or amend any data currently held. View Only users cannot add or access details of additional users.
The user has now been added and an email with a registration link will be sent to the email address entered to allow the new user to set up their login details.
Editing existing users
To view and amend existing users click on the user name from the Select User or Add New dropdown and their details will be displayed.
From this screen you can amend any existing personal details and:
- Resend the Registration Email.
- Send a forgotten password email to enable the user to reset their login details if required.
- Amend the level of access a user has.
- Remove access for a user by selecting Yes under the Deny Login.


